
Quick Summary: To use a hardware wallet with MetaMask, connect your device via USB (or Bluetooth for Ledger), select “Add hardware wallet” in the MetaMask account menu, choose your device (Ledger/Trezor), and approve the connection to manage assets securely.
Well, you probably use MetaMask because it is so easy to use for trading and connecting dapps, but it has some risks since it is a hot (online) wallet. The best way to fix this is by integrating MetaMask with a hardware wallet, so your private always stored in a cold wallet, whereas MetaMask acts as a UI software only.
The best hardware wallets to use with MetaMask integration are Ledger Flex, ELLIPAL Titan 2.0, Trezor Safe 5, and Keystone 3 Pro. All of these cold wallets are officially supported by MetaMask.
Okay, so, in this guide, I will cover how to use a hardware wallet with MetaMask securely…
List of Top MetaMask Hardware Wallets You Can Use…
I have already covered this list, check here: The best hardware wallets for MetaMask… You can buy whatever you like, but I recommend you go for either Ledger Flex or ELLIPAL Titan 2.0. These two are the most popular hardware wallets to connect with MetaMask.
Ledger Flex

ELLIPAL Titan 2.0
Trezor Safe 5
How to Use a Hardware Wallet With MetaMask (Step-by-Step Guide)
Look, I am going to show you how to do this using the Ledger Flex as our main example because it is the most popular choice today. You can apply similar steps with Trezor and ELLIPAL as well…
Before you start
- Start by updating Ledger Wallet (previously known as Ledger Live) to the newest version using the official download link.
- Next, connect your Ledger device to Ledger Wallet and confirm that it is running the latest Ledger OS.
- You should also check that the Ethereum (ETH) app on your Ledger device is fully up to date.
- Now, once everything is updated, you need to close Ledger Wallet completely, since keeping it open can sometimes interfere with MetaMask.
Now, connecting your Ledger to MetaMask
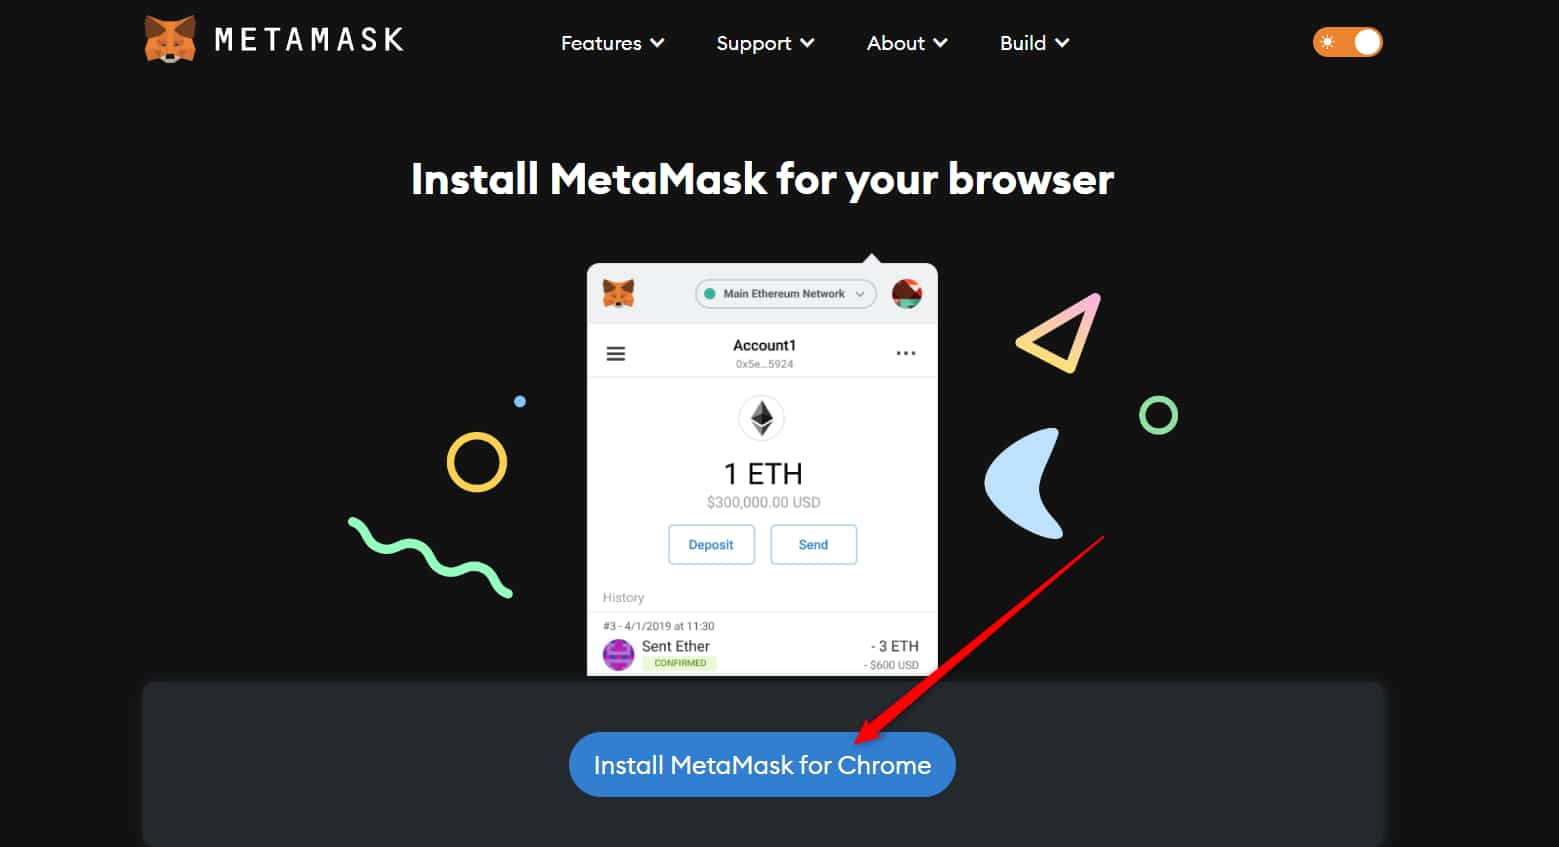
Step 1: Download MetaMask Extension or App
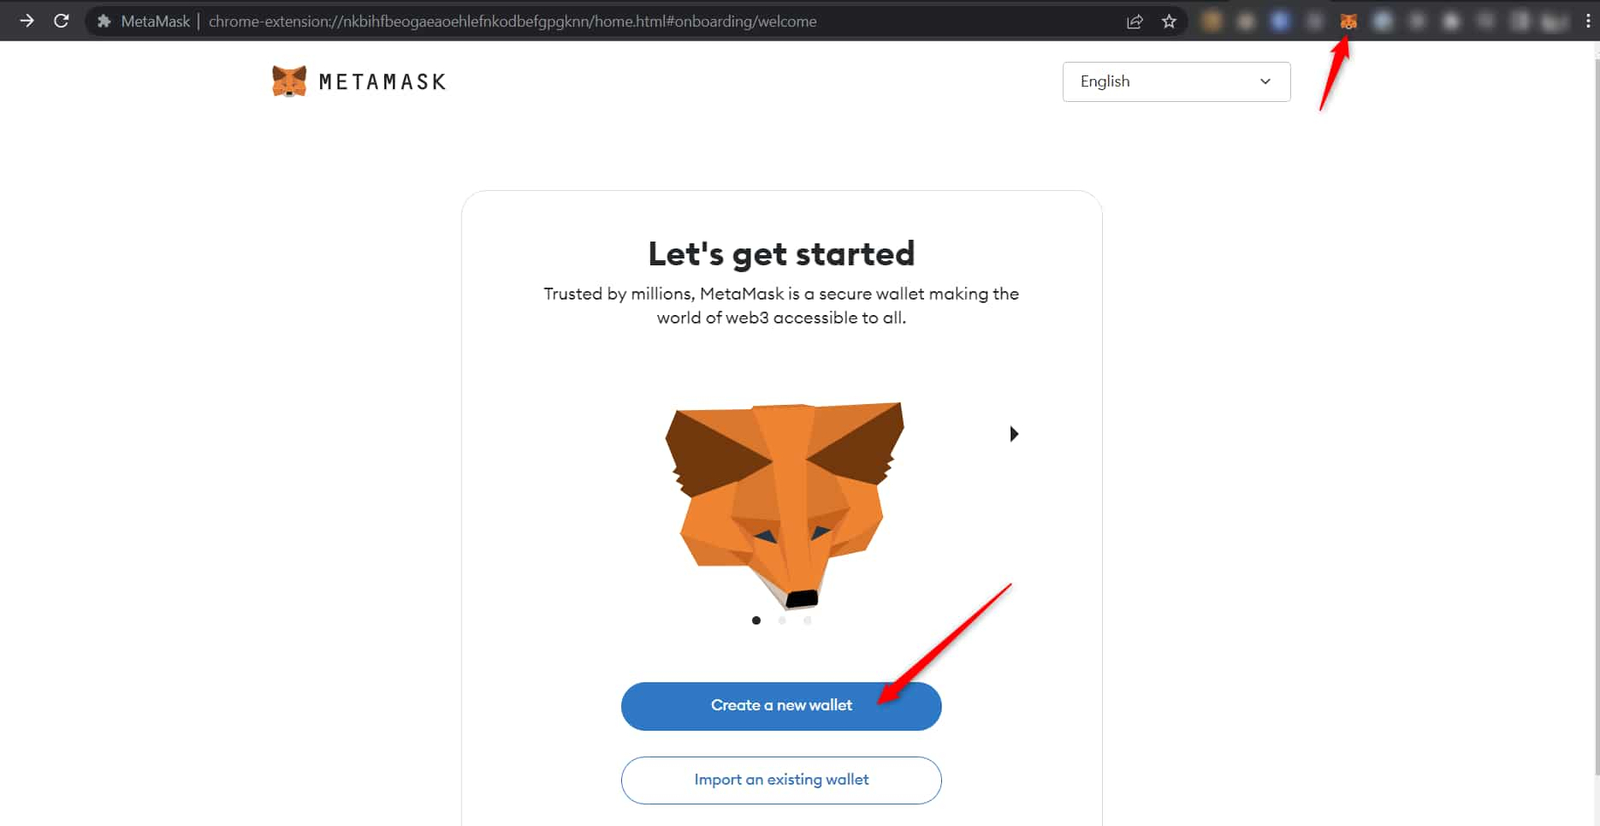
You should visit “https://metamask.io/download/” and click on Install MetaMask for your preferred browser. Now, add the MetaMask browser extension and complete the installation process. You can now pin the MetaMask extension to your browser toolbar and choose “Create a new wallet” to begin setup.
Important Tip: You should never import your Ledger 24-word Secret Recovery Phrase into MetaMask using the “Import an existing wallet” option. Well, doing so would convert your Ledger into a hot wallet and significantly weaken the security of your funds. Similarly, you should not import a Secret Recovery Phrase generated by MetaMask into your Ledger device. You see, MetaMask recovery phrases are created online and are not designed for secure cold-storage use.
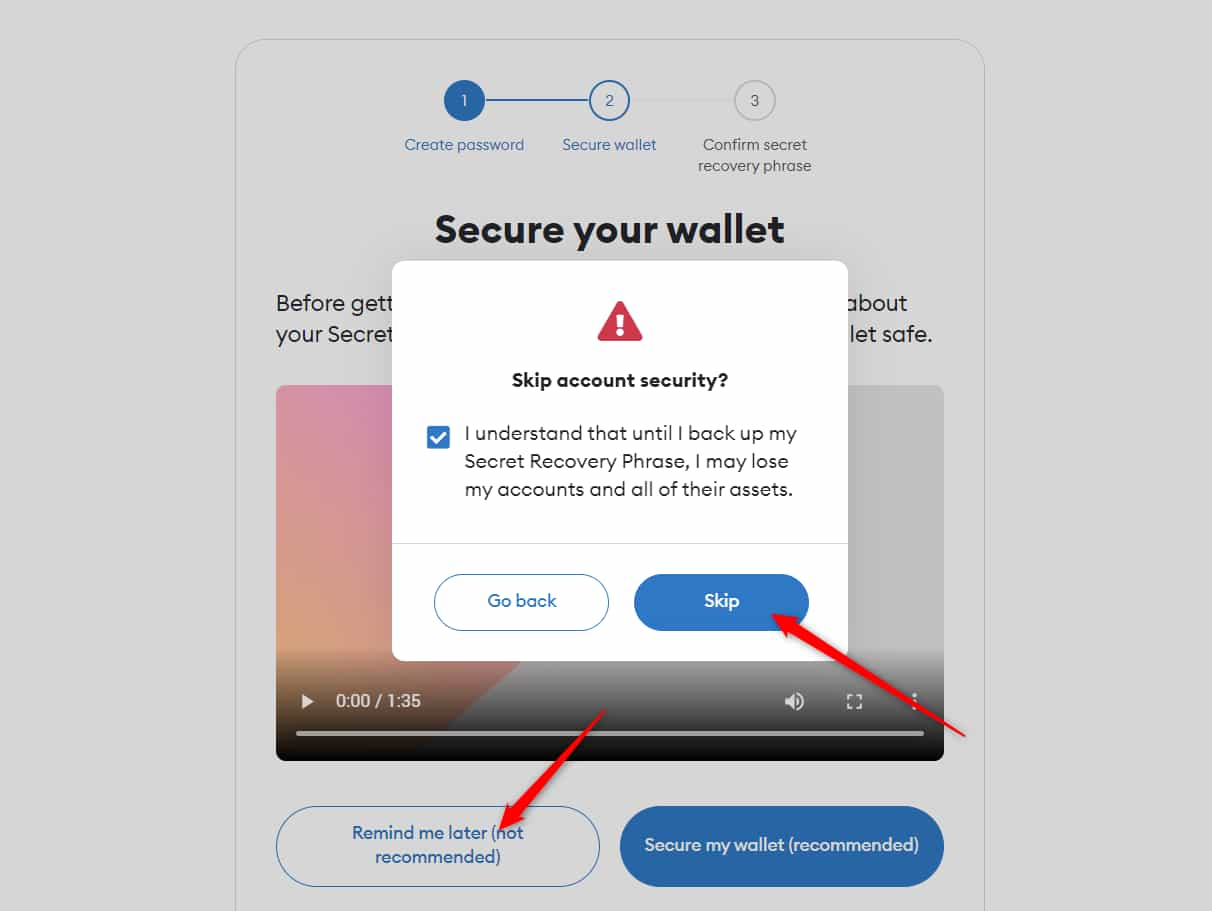
Now, after reviewing this, agree to the terms, set a password, and click Create a new wallet.
Because you are using a Ledger device, you do not need to back up a MetaMask recovery phrase. Select Remind me later, then choose Skip.
Step 2: Integrate Ledger Hardware Wallet to MetaMask
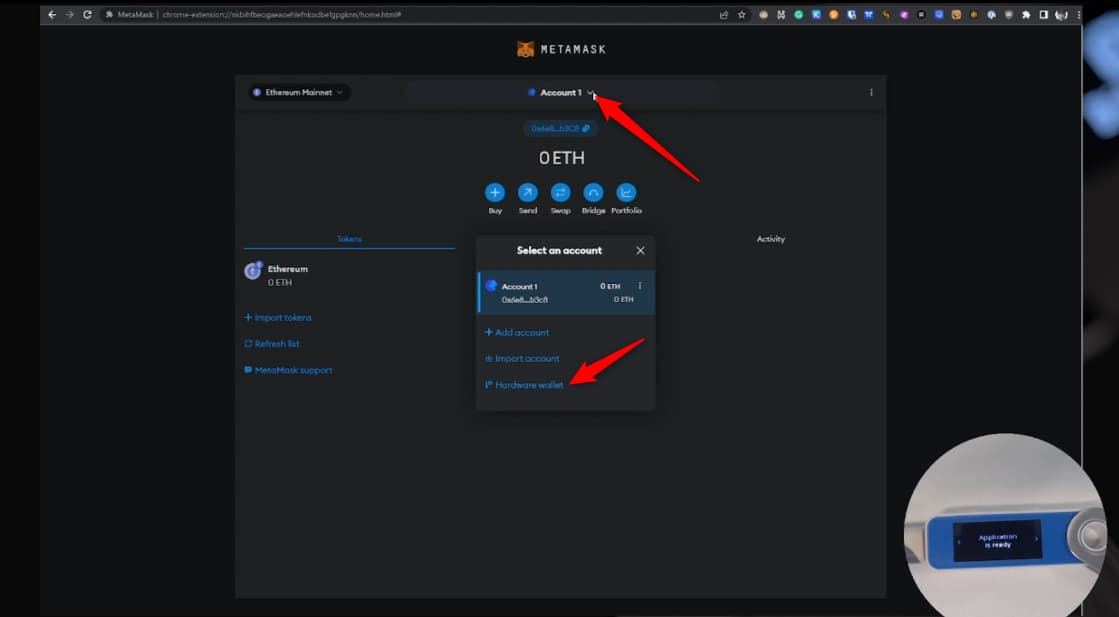
Now it’s time to connect your Ledger device. Plug your Ledger into your computer and open the Ethereum (ETH) app on the device by navigating to the Ethereum icon and pressing both buttons together. Your Ledger screen should display the message: Application is ready.
Now, open MetaMask account settings and select “Hardware wallet”.
Choose Ledger, then click Continue. After a short pause, MetaMask will display a list of available accounts. These accounts are sourced directly from your Ledger device. You need to select the account you want by checking the box next to it, then click Unlock.
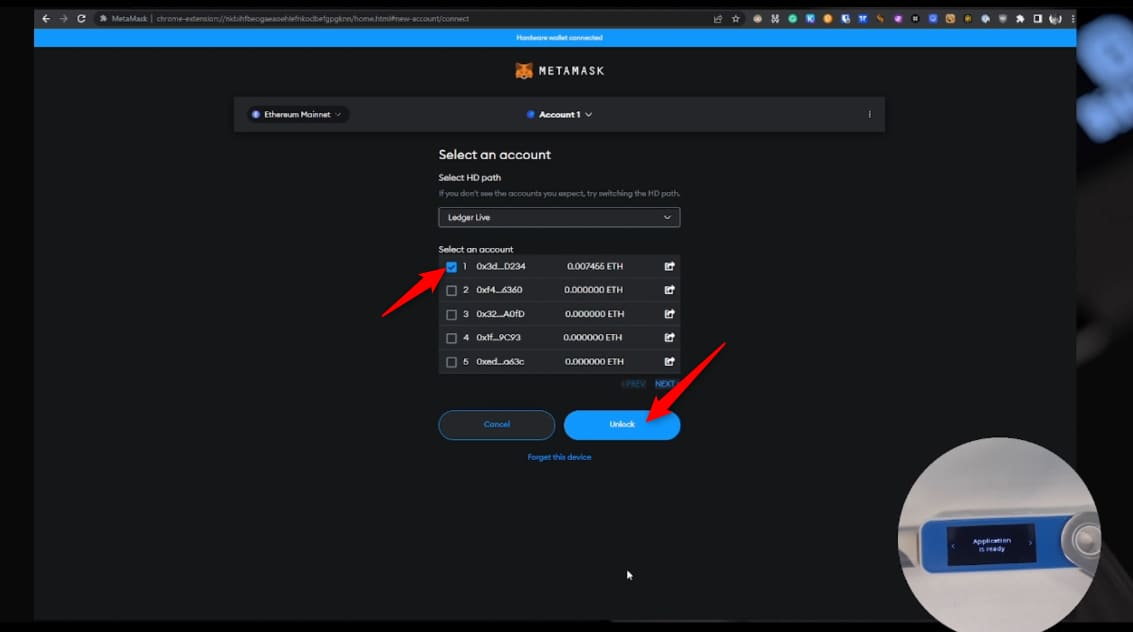
That’s it. Your Ledger Ethereum account and ETH balance will now be visible inside MetaMask. Any Ledger account connected this way will show a “LEDGER” label to indicate it is hardware-secured.
Step 3: Verify Your Assets (Send or Receive)
You should now see a new account in your MetaMask list that has a “Hardware” or “Ledger 1” tag next to it. By the way, your balance will show as 0 ETH if you haven’t sent any money to this new address yet.
You can now copy this address and use it to receive funds from exchanges or your old “hot” wallet accounts.
How to Upgrade from MetaMask to Hardware Wallet?
Well, upgrading from a MetaMask to a hardware wallet requires a complete migration of your digital assets to a new set of offline keys. You see, most beginners make the mistake of simply connecting the device and assuming their old MetaMask address is now “protected.”
This is a false sense of security because your old private keys were generated on an internet-connected computer and are forever considered “hot” or potentially exposed. To truly upgrade, you must abandon your old address and start fresh with the address generated by your Ledger, Trezor, or ELLIPAL.
- You must first set up your crypto hardware wallet as a new device and generate a fresh 24-word secret recovery phrase that has never touched a digital screen.
- Connect your hardware wallet to the MetaMask extension/app using the official “Add hardware wallet” feature as described in the previous sections of this guide.
- Copy the public Ethereum address of your new hardware account from the MetaMask interface and double-check it against the address shown on the physical device screen.
- Switch back to your original MetaMask “Account 1” and initiate a transfer for each token you own by pasting the hardware address into the recipient field.
- You can easily send a small test transaction of a few dollars worth of ETH or USDC to ensure you have the correct address and network selected.
- Verify that the test funds arrived in your hardware account before you proceed to transfer the entire remaining balance of your portfolio.
- Repeat this process for all your NFTs and ERC-20 tokens on different networks like Polygon, Base, or Arbitrum to ensure every asset is moved to the offline keys.
- Revoke any active smart contract approvals on your old account using tools like Revoke.cash to prevent any residual risks from linked decentralized apps.
- Now, you can delete the old MetaMask extension from your browser once all funds are moved and perform a clean install with a “dummy” seed phrase to use with your hardware device.
- Also, keep a small amount of gas money in your old wallet temporarily if you need to pay for any final transaction fees or contract cancellations.
How to Secure Metamask with Hardware Wallet?
Securing your MetaMask with a hardware wallet involves using the device as a “signer”. MetaMask acts only as a window to view your coins, while the actual private keys stay locked inside the secure element chip of your cold storage wallet.
Well, this setup ensures that even if a hacker gains remote access to your laptop, they cannot steal your money without physically holding your device and knowing your PIN code.
- You should always verify the destination address and the exact amount of crypto on the physical screen of your hardware wallet before you press the confirm buttons.
- Never enter your hardware wallet recovery phrase into any website, pop-up window, or even the MetaMask settings page under any circumstances.
- Use the “Connect Hardware Wallet” function only. You should never use the “Import Account” option that asks for a private key or a JSON file.
- You need to keep your hardware wallet firmware updated to the latest version.
- Store your backup recovery phrase on a metal plate or high-quality paper and place it in a fireproof and waterproof safe that is hidden from public view.
- Enable the “Passphrase” or “25th Word” feature on your device to create a hidden “hidden wallet” that provides an extra layer of protection against physical theft or coercion.
- Limit your smart contract approvals to only the exact amount of tokens you intend to spend to prevent malicious apps from draining your entire wallet balance.
- You can also bookmark the official MetaMask and hardware wallet websites to avoid falling for phishing scams that use look-alike URLs in search engine results.
- Use a dedicated, clean browser or a separate user profile on your computer specifically for your crypto transactions to reduce the risk of malicious browser extensions.
- Try to check the authenticity of the device using the manufacturer’s official software when you first receive it to ensure it hasn’t been tampered with during shipping.
Conclusion: How to Connect Hardware Wallet to MetaMask
In a nutshell, using a hardware wallet with MetaMask is the smartest thing you can do to protect your crypto investments. Yes, it is a bit of a process to set up everything for the first time, but the peace of mind you get is totally worth the effort.
You can get to keep using all your favorite DeFi platforms and NFT marketplaces while knowing that a remote hacker cannot touch your coins. Sure, it costs around $80 to $150 to buy a good Ledger or Trezor, but that is much cheaper than losing your entire portfolio in a single hack.
FAQs
How to connect Trezor with MetaMask?
The integration of Trezor with MetaMask requires the “Trezor Bridge” software and a physical USB-C connection to your computer desktop. You must first install the Trezor Suite app to ensure your device has the latest firmware version 2.8.1 or a newer update.
Now, once the device is ready and unlocked with your PIN, you need to open MetaMask and navigate to the “Add hardware wallet” menu. Select “Trezor” and the platform will redirect you to a secure connect page to export your public keys.
Finally, this process allows MetaMask to see your balance and transaction history without ever touching your private keys. You must then confirm the public key export on your Trezor’s physical touchscreen to complete the setup.
Does Ledger support MetaMask integration?
Yes, Ledger fully supports MetaMask integration through its “WebHID” technology on desktop and Bluetooth for all mobile users. You can connect the Ledger Flex, Nano X, or Nano S Plus to the MetaMask browser extension on Chrome, Brave, or Firefox. The wallet requires you to have the Ethereum app version 1.6.0 or higher installed on your Ledger device from the Ledger Live Manager.
Can I use ELLIPAL Titan with my MetaMask?
You can use the ELLIPAL Titan 2.0 with MetaMask by using the QR-based connection method found in the extension settings page. Since the Titan 2.0 is a 100% air-gapped device, it does not use cables or Bluetooth to talk to your computer.
Instead, the device uses its built-in camera to scan transaction details from the MetaMask QR code on your computer screen. You then sign the transaction on the 4-inch Titan screen and show a response QR code back to your computer’s webcam.
Is it safe to use MetaMask with a hardware crypto wallet?
Yes, using MetaMask with a hardware wallet is really best for security because it combines a fast UI with offline key storage. Now, MetaMask will only act as a bridge to the blockchain and never store your private keys or your secret recovery phrase.
And, every outgoing transaction requires a physical button press on your Ledger or Trezor device to be valid. It prevents remote hackers from draining your wallet even if they have full control over your computer or browser.